Setting up Team City for deployment of an Azure Website was sort of complicated but, overall, not too bad. The built in build steps all worked together pretty nicely and I didn’t have to provide any external scripts or utilities to help with the process. Deployment of an Azure Worker Role is not quite the same.
I owe big thanks to Scott Kirkland whose post, CI Deployment Of Azure Web Roles Using TeamCity was the basis for my own understanding.
This post assumes you already have an Azure “Worker Role” project created and you are ready to deploy it to the cloud. In fact, it assumes you’ve already published it from within Visual Studio at some point. I am using Visual Studio 2012 and I can’t comment on how to do that step in more modern versions of Visual Studio so I am going to skip it.
The biggest change between my post and Scott Kirkland’s is the fact that the Azure PowerShell Script had to be updated to support the way the commandlets are installed now (4 years after Scott’s post).
Team City Server Prerequisites
- Azure SDK - Just go, log in, download and install the SDK you need.
- Azure Powershell - This page has a few different ways to install Azure PowerShell. I used the first one called “WebPI”. I don’t use PowerShell much and I was unable to get the second option (the PowerShell Gallery) to work on my Team City server. After installing I did have to reboot.
- Your Azure publishsettings file. The easiest way to do this is to open your Azure PowerShell and then execute the command
Get-AzurePublishSettingsFile. This will open your default browser and require you to login. Once you’ve logged in the file will download automatically. I suggest you move it to somewhere handy likeC:\TeamCityand rename it to something likeazure.publishsettings. The default name is fairly opaque.
Once you have completed that you need to set up your TeamCity Project.
Team City Project Setup
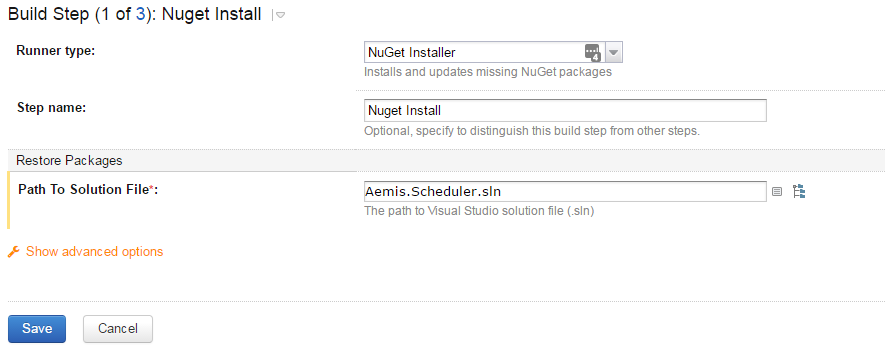
I have three build steps in my project; NuGet Install, MSBuild, and PowerShell.
Nuget Install
MSBuild
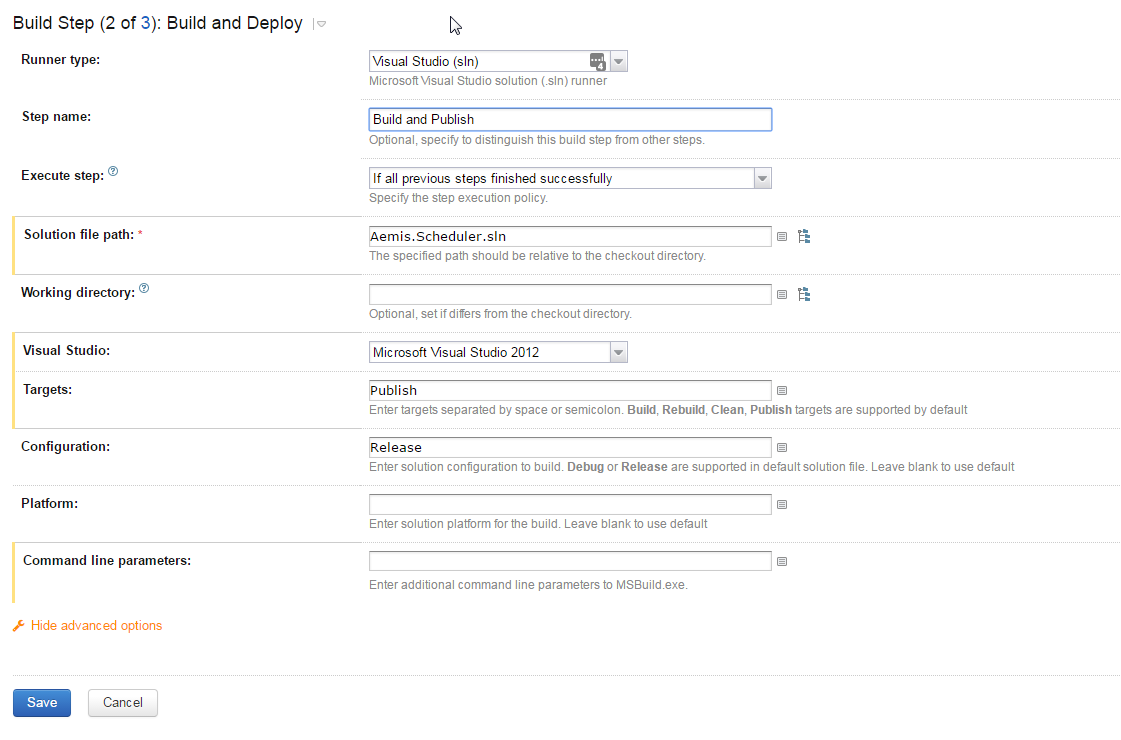
You’ll want to run your Team City build once before you add the PowerShell steps. Just make sure MSBuild works okay and to make sure everything is kosher. At this point I had to modify the two files created by the build; ServiceConfiguration.Cloud.csfg and ServiceConfiguration.Local.Csfg by adding a node called ConfigurationSettings and another called Certificates. Both of these nodes I was able to copy from the files in my Visual Studio project. I intentionally don’t commit either of those files to version control (Git) because they contain some secrets in them. Your ConfigurationSettings should have at least five settings under it:
- Microsoft.WindowsAzure.Plugins.RemoteAccess.Enabled
- Microsoft.WindowsAzure.Plugins.RemoteAccess.AccountUsername
- Microsoft.WindowsAzure.Plugins.RemoteAccess.AccountEncryptedPassword
- Microsoft.WindowsAzure.Plugins.RemoteAccess.AccountExpiration
- Microsoft.WindowsAzure.Plugins.RemoteForwarder.Enabled
Plus you’ll have at least one Certificate
- Microsoft.WindowsAzure.Plugins.RemoteAccess.PasswordEncryption
My project would not build on TeamCity without those values.
At this point, it should be obvious, that you want to keep your TeamCity server secure. You’ve already downloaded your publishsettings file (which contains sensitive data) and you’ve put sensitive data in these csfg files. I don’t know if there is a better way to do this! If there is please leave a comment.
PowerShell
Next, we need to define the PowerShell step; this part uses the commandlets you installed before via PowerShell script that will either create the new deployment if you’ve never deployed before OR will update the existing deployment. This script is almost entirely from Scott’s blog with the exception of a few minor mods to get it working with the current Azure SDK and commandlets and to make it callable as an external script file.
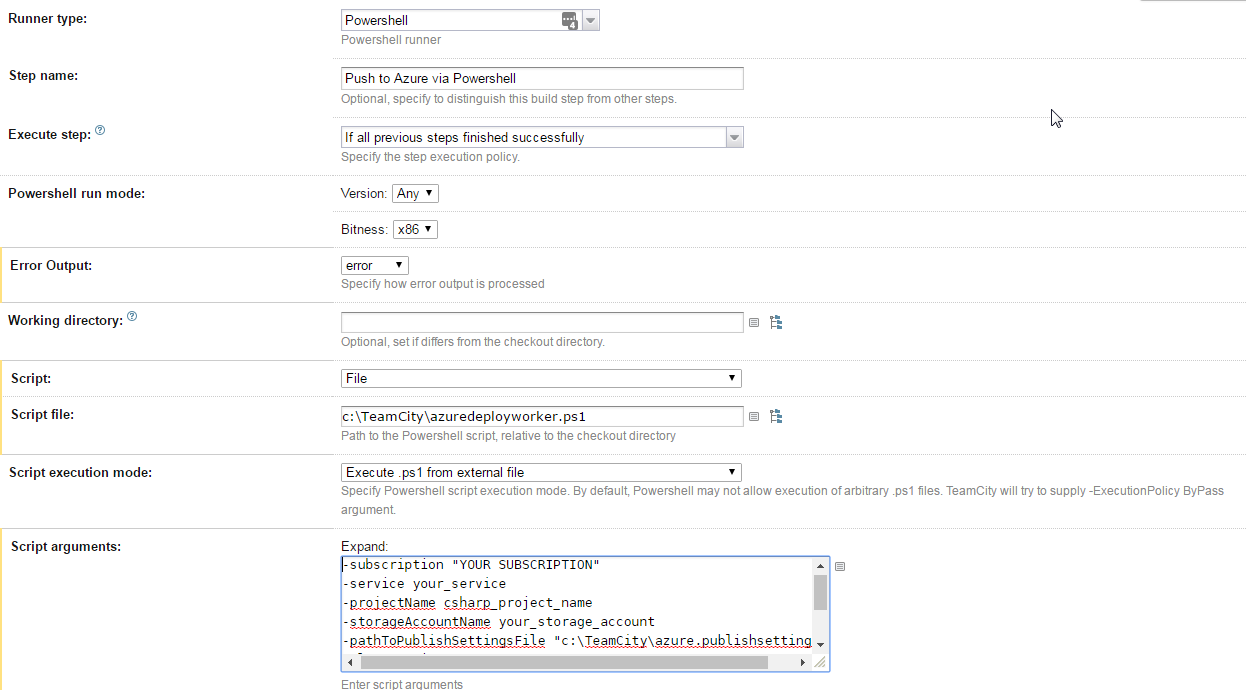
In the Script field keep “file” and in the script file field you’ll need to put the path to the powershell script I’ve provided at the end of this post and in a gist. You may need to edit the powershell script path to the imported modules if Azure Powershell changes after this is published. As of 5 April 2016 those paths should be valid for the vast majority of installations.
You’ll need to expand the Script Arguments field so you can provide the various arguments. There are nine possible but only the first five are required.
** REQUIRED ARGUMENTS **
- subscription - the name of your Azure subscription. You can find that on your Azure Management Portal; on the All Items screen, in the Subscription column.
- service - this is the Azure Cloud Service you’re deploying/upgrading. You can find that on your Azure Management Portal; on the All Items screen, in the Name column.
- projectName - the name of your Visual Studio project that contains the “Role” - this is your startup project in the solution.
- storageAccountName - the name of your Azure storage account that is tied to your service. You can find that on your Azure Management Portal; on the All Items screen, in the Name column.
- pathToPublishSettingsFile - where you saved your publish settings. In the earlier example that is
c:\TeamCity\azure.publishsettings
** OPTIONAL ARGUMENTS **
- slot - production or staging. default: staging
- buildConfigName - release or debug. default: release
- timeStampFormat - look at the azure docs for formats. default: g
- deploymentLabel - how the deployment should be identified in the Azure management portal. Default: Continuous Deploy. I recommend overriding this to something like: “Continuous Deploy to $service v%build.number%” which will give you much more useful information in the portal.
Trigger a Failure in TeamCity
According to the TeamCity documentation you need to catch information in the build log to know if something went wrong. The script facilitates that but throwing error messages proceeded by “POWERSHELL ERROR” and using an exit code of 1. However, for these to be caught you need to set up a failure condition in TeamCity for your project.

[CmdletBinding()]
Param(
  [Parameter(Mandatory=$True,Position=1)]
   [string]$subscription,

   [Parameter(Mandatory=$True,Position=2)]
   [string]$service,

   [Parameter(Mandatory=$True,Position=3)]
   [string]$projectName,

   [Parameter(Mandatory=$True,Position=4)]
   [string]$storageAccountName,

   [Parameter(Mandatory=$True,Position=5)]
   [string]$pathToPublishSettingsFile,


   [Parameter(Mandatory=$False,Position=6)]
   [string]$slot="staging",

   [Parameter(Mandatory=$False,Position=7)]
   [string]$buildConfigName="release",


   [Parameter(Mandatory=$False,Position=8)]
   [string]$timeStampFormat="g",


   [Parameter(Mandatory=$False,Position=9)]
   [string]$deploymentLabel="Continuous Deploy"

)


$package = "$($projectName)\bin\$($buildConfigName)\app.publish\$($projectName).cspkg"
$configuration =  "$($projectName)\bin\$($buildConfigName)\app.publish\ServiceConfiguration.Cloud.cscfg"
$errorKey = "POWERSHELL ERROR"

Write-Host "Running Azure Imports"
try {
  Import-Module "C:\Program Files (x86)\Microsoft SDKs\Azure\PowerShell\ResourceManager\AzureResourceManager\AzureRM.Profile\AzureRM.Profile.psd1"
  Import-Module "C:\Program Files (x86)\Microsoft SDKs\Azure\PowerShell\Storage\Azure.Storage\Azure.Storage.psd1"
  Import-Module "C:\Program Files (x86)\Microsoft SDKs\Azure\PowerShell\ServiceManagement\Azure\Azure.psd1"
} Catch {
  $ErrorMessage = $_.Exception.Message
  Write-Host $errorKey
  Write-Host "Error Importing Modules"
  Write-Host $ErrorMessage
  exit(1)
}


# import settings
Write-Host "Import Settings File"
try {
  Import-AzurePublishSettingsFile $pathToPublishSettingsFile
} Catch {
  $ErrorMessage = $_.Exception.Message
  Write-Host $errorKey
  Write-Host "Error Importing Publish Settings File"
  Write-Host $ErrorMessage
  exit(1)
}

#setup azure information
Write-Host "Setup Azure Subscription Information"
try {
  Set-AzureSubscription -CurrentStorageAccount $storageAccountName -SubscriptionName $subscription
} Catch {
  $ErrorMessage = $_.Exception.Message
  Write-Host $errorKey
  Write-Host "Error Setting Azure Subscription"
  Write-Host $ErrorMessage
  exit(1)
}


# DEFINE FUNCTIONS

function CreateNewDeployment()
{
    Write-Host -id 3 -activity "Creating New Deployment" -Status "In progress"
    Write-Host "$(Get-Date -f $timeStampFormat) - Creating New Deployment: In progress"

    $opstat = New-AzureDeployment -Slot $slot -Package $package -Configuration $configuration -label $deploymentLabel -ServiceName $service

    $completeDeployment = Get-AzureDeployment -ServiceName $service -Slot $slot
    $completeDeploymentID = $completeDeployment.deploymentid

    Write-Host -id 3 -activity "Creating New Deployment" -completed -Status "Complete"
    Write-Host "$(Get-Date -f $timeStampFormat) - Creating New Deployment: Complete, Deployment ID: $completeDeploymentID"
}

function UpgradeDeployment()
{
    Write-Host -id 3 -activity "Upgrading Deployment" -Status "In progress"
    Write-Host "$(Get-Date -f $timeStampFormat) - Upgrading Deployment: In progress"

    # perform Update-Deployment
    $setdeployment = Set-AzureDeployment -Upgrade -Slot $slot -Package $package -Configuration $configuration -label $deploymentLabel -ServiceName $service -Force

    $completeDeployment = Get-AzureDeployment -ServiceName $service -Slot $slot
    $completeDeploymentID = $completeDeployment.deploymentid

    Write-Host -id 3 -activity "Upgrading Deployment" -completed -Status "Complete"
    Write-Host "$(Get-Date -f $timeStampFormat) - Upgrading Deployment: Complete, Deployment ID: $completeDeploymentID"
}


function Publish(){
 $deployment = Get-AzureDeployment -ServiceName $service -Slot $slot -ErrorVariable a -ErrorAction silentlycontinue
 Write-Host $deployment

 if ($a[0] -ne $null) {
    Write-Host "$(Get-Date -f $timeStampFormat) - No deployment is detected. Creating a new deployment. "
 }

 if ($deployment.Name -ne $null) {
    #Update deployment inplace (usually faster, cheaper, won't destroy VIP)
    Write-Host "$(Get-Date -f $timeStampFormat) - Deployment exists in $servicename.  Upgrading deployment."

    try {
      UpgradeDeployment
    } catch {
      $ErrorMessage = $_.Exception.Message
      Write-Host $errorKey
      Write-Host "Error Upgrading Deployment"
      Write-Host $ErrorMessage
      exit(1)
    }
 } else {
    try {
      CreateNewDeployment
    } catch {
      $ErrorMessage = $_.Exception.Message
      Write-Host $errorKey
      Write-Host "Error Upgrading Deployment"
      Write-Host $ErrorMessage
      exit(1)
    }
 }
}

Publish

Exit(0)
At this point you should be able to run your build on TeamCity and see that your worker role has been deployed properly. You can always tell by viewing the build log on TeamCity and by going to your Cloud Service “Dashboard” on the Azure Management Portal and looking in the right column for “Deployment Label” It should say something like Continuous Deploy to MyService v39 or whatever value you defined for the deploymentLabel argument.