This post is mostly to help a customer switch his current configuration. I have no access to his server and need to help him get Coldfusion 11 working properly. He currently has it installed and connected to IIS but it doesn’t work quite well. For instance if he goes to http://hishost.com/ the index.cfm page loads fine. But if he goes to http://hishost.com/index.cfm he gets a 404 error. Becuase I work almost exclusivly with Apache and I can’t recreate his problem it seemed easier to just move him to Apache. If you know what caused the problem he is having (he has a cfide and jakarta virtual directory already) then I’d love to hear your thoughts in the comments below.
Turn off IIS
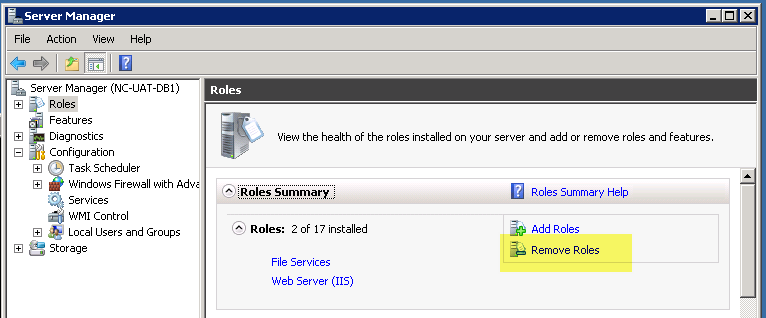
The first step in this migration is to get rid of IIS. The server we are working on is a Windows 2008 R2 Server so you might have to adjust these instructions based on your version of Windows. The basic idea though is that we need to turn off the IIS feature within Windows by removing a Role (makes no sense really).
- Right click on “My Computer” and select “Manage” from the contextual menu
- After the “Server Manager” window opens go to the “Roles” option
- Click on “Remove roles”
- A dialog will open. Uncheck “Web Server (IIS)”
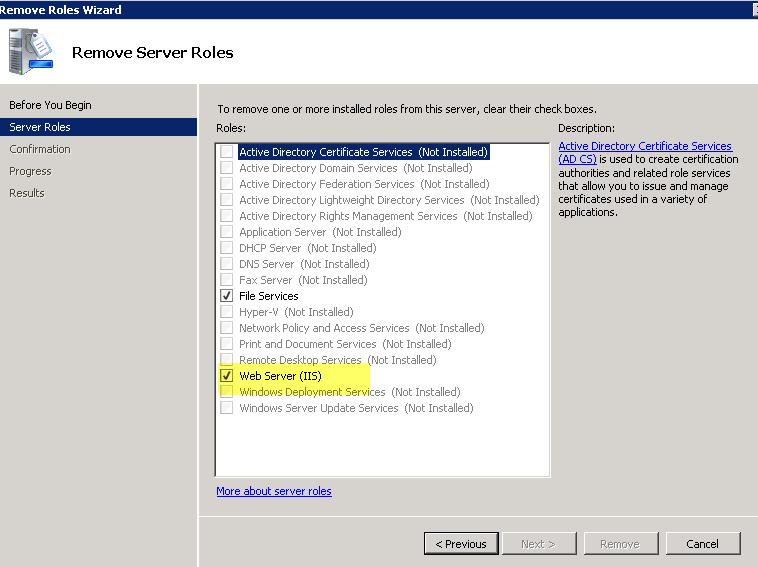
- Click on “Remove” and let Windows do it’s thing. You will have to restart the computer when it is done; if so, reboot!
Install Apache Webserver
Now you need to get Apache. Simply because I’m more familiar with Apache 2.2.x we’ll be using that instead of 2.4. Once I’ve had some time to muck around with 2.4 and it’s configuration changes I will have him upgrade to 2.4.x.
First things, first, we need to download the webserver. You can get it at the Apache Haus dowload page. Apache doens’t actually offer the compiled binaries at their site so we are using Apache Haus. When you click on that link it will take you directly to the US download site and the download should start automatically. You’ll end up with a zip file.
In our case the server’s C drive is pretty small so we are going to install Apache on the D drive. Extract the zip file and you’ll get two things; a readme_first.html file and a folder labelled Apache22. Move the Apache22 folder to the root of the D drive. D:\Apache22 is now your apache server root.
That’s all it takes to install Apache but we need a service we can manage so open a command prompt (as Administrator) and enter the following:
  d:
  cd \Apache22\bin
  httpd -k install
Now the service exists so you can start it either at the command prompt, via the services module, or by using the Apache Server Monitor (located at D:\Apache22\bin\ApacheMonitor.exe).
Let’s start it to make sure it works properly. From the same command prompt you can enter
httpd -k start
Configure Apache
Before we connect Coldfusion to Apache we need to make sure it is configured properly for your needs. Becuase it will be serving from a specific IP address and will be supporting Virtual Hosts we’ll want to configure those things. Plus, eventually it will serve coldfusion so we’ll update the default document list to include index.cfm
We’re basically going to be editing two files, httpd.conf and httpd-vhosts.conf.
httpd.conf
The http.conf file is located in the D:\Apache22\conf directory. Open that in your favorite text editor (hopefully note notepad). If you need a decent, free text editor download atom. Once in httpd.conf we need to change a few lines.
ServerRoot "D:\Apache22"
...
Listen {ipaddress:}80
Listen {ipaddress}:{alternateport}
...
ServerAdmin {your_email_address}
...
# ServerName localhost:80
...
DocumentRoot "d:\Apache22\htdocs"
...
<Directory "/Apache22/htdocs">
  ...
  Options -Indexes FollowSymLinks
  ...
</Directory
...
DirectoryIndex index.html index.shtml index.php default.htm default.html index.php index.cfm
...
# Virtual hosts
Include conf/extra/httpd-vhosts.conf
...
Basically you’ll find the relevant parts of the conf file and update them to reflect those changes replacing any placeholders with actual values. The second Listen line will have the port for your dev site. The # represents a comment. For the time being we are commenting out the line about the ServerName.
httpd-vhosts.conf
The httpd-vhosts.conf file is located in the D:\Apache22\conf\extra directory. In here we will define the two virtual hosts that are needed. The first is for the main “production” copy of the site and the second is for a development copy of the same site.
I’m not going to show any detail here. If you have questions about how this file needs to be set up just leave a comment.
Organizing your site source code
Because we have two copies of the site we need to setup as two virtual hosts we are going to define a directory heirarchy to make things a little easier. It will look sort of like this:
d:\
---MyApplication
------production
---------logs
---------site
------------application
------development
---------logs
---------site
------------application
Once all the configuration files have been updated and the directory structure is created lets try to restart Apache. We’ll try to start it from the command line so we can see if something goes wrong faster.
d:
cd Apache22\bin
httpd -k stop # incase it's still running
httpd -k start
If something went wrong starting it you might see an error in the console. You can also look in D:\Apache22\logs\error.log for more information.
Connecting Coldfuion 11
This is pretty simple and should work without any problems.
- Using windows explorer go to
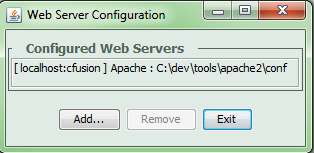
D:\Coldfusion11\cfusion\runtime\bin\and double click on the ‘wsconfig.exe’ You’ll end up seeing something like this.
- Click on the “Add…” button
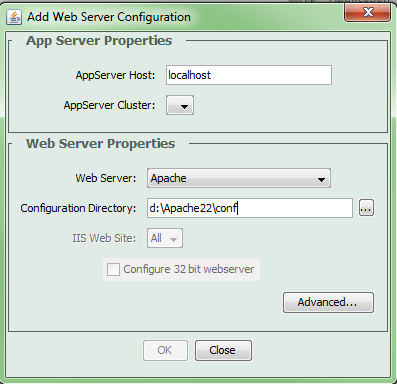
- Change the “Web Server:” value to Apache
- In the Configuration Directory enter “D:\Apache22\conf”
- Click on the “Advanced” button
- In the “Directory and filename of server binary” enter “D:\Apache22\bin\httpd.exe”
- Click “OK”
- Click “OK” again.
The connector will try to restart Apache. It should work without a hitch. If you’re curious you can see that the connector did a couple things. First it created a new file in the D:\Apache22\conf directory titled “mod_jk.conf” (stands for jakarta module I believe). It also updated the httpd.conf file and added the line Include "D:\APache22\conf\mod_jk.conf" to the end of the file.
At this point your websites should work as Coldfusion 11 websites. If you are having a problem leave a comment and I’ll try to provide some limited help.